
My initial problem was to get nice smooth graduations in a monochromatic background for a page in an alphabet book. I'd come up with the concept to paint designs as a kind of "wallpaper" background with the main image, text and large alphabet letter going on top.I wasn't using any computer graphics for this particular book, I don't use an airbrush, and I was working in acrylics....not known for their ease of getting a smooth graduation in colours.I had been studying the work of a 20th century illustrator Maxfield Parrish, and found that he tackled the problem of smooth backgrounds with glazes "pounced" with a large soft brush. Since he worked in oils (i.e. a time before acrylics), he used linseed oil as his glaze medium, and layers took foreeeeever to dry. I am lucky to be living with acrylics, so I could update the technique for my illustrations. I also didn't like the look of pounced glazes....still too many marks in the paint surface
I went thru my paints and found a sample of Golden (brand name) Glazing liquid and I had numerous bottles of Golden fluid acrylics. Fluid acrylics have the same pigment load as regular paints, but are cut with more clear acrylic so they are the consistency of cream as opposed to regular paints which are more like toothpaste. I found that if I puddled a bit of the glazing liquid on my palette then dropped in a drop of fluid acrylics and mixed with a knife.....I got a lovely looking glaze, that would be accepted readily by the sponge.
I was working on 3 ply bristol board at the time. I ran the sponge brush over the entire board and let it dry. It bent a bit at first, but with some adjustment to the liquid load....the board dried nice and flat. I could then apply another coat if I wanted to modify the colour in some way without any lifting that occurs in watercolours. As an extra added benefit, I found that the "tooth" was just perfect for coloured pencils, without the plastic effect that acrylics normally have.
I ended up with the best of all worlds. I could get my graduations without computer or an airbrush. I could also add texture just by changing the sponge brush I use. And any additional artwork I wanted to put on top would be accepted without any problems.
this looks really good, Alison! The first thing that struck me was the nice balance of light and dark. And it's always cool when you experiment and it comes off well (I really like using sponges when I'm putting pictorials on my signs--that and just plain old fingers).
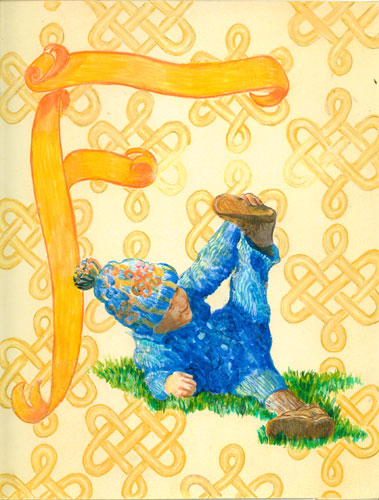
ReplyDeleteI also like the way you included the background symbol in the sock hat. Those little subliminal things are always fun for kids, I think.
I lOVE this kid! and your colors are so brilliant.Thanks for sharing your technique with us, I would have never know that sponges could give you that kind of gradation! Thanks too for the interesting facts on Maxfield Parrish.
ReplyDelete